
Text that looks clear when enlarged on screen can close up or disappear on a 55 mm tag. Check exact wording, letter geometry, relief, borders and ring opening in millimetres, then inspect a true-size representation before a physical trial.
Download the English project worksheet. Open it as UTF-8 CSV, replace the guide context with your project inputs and record observations separately from acceptance decisions. Blank cells do not indicate a passed check.
Freeze the wording and outside dimensions
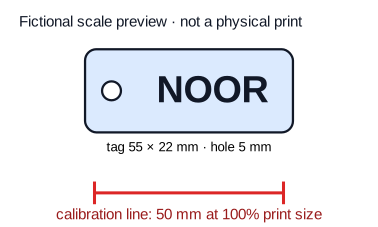
Copy the exact text, including capitals, spaces, accents and punctuation. Specify maximum width, height and thickness. Do not silently change spelling to make it fit. The fictional example uses NOOR on a 55 × 22 mm tag. It is not a customer product or physical readability test.
Measure letters as geometry
Measure letter height, thinnest stroke, smallest counter and inter-letter gap. A font-size setting is not the physical outline measurement. Ask which limits apply to the chosen process, material and orientation instead of importing a universal minimum. For vector artwork, follow the SVG relief checks, including closed contours and negative spaces.
| Feature | Synthetic value | Check before production |
|---|---|---|
| Tag | 55 × 22 mm | Confirm final dimensions |
| Letter height | 7 mm | View at true size |
| Smallest stroke | 1.0 mm | Confirm process suitability |
| Relief depth | 0.8 mm | Assess visible and tactile result |
| Edge clearance | 2.5 mm | Measure around the entire outline |
| Ring hole | 5 mm | Assess ring and surrounding material |
These values illustrate the decision, not production recommendations.
Check contrast, relief and the attachment separately
Choose raised or recessed text and identify the main visible face. Colour contrast may help readability, but a digital preview does not prove the physical material or finish. Measure the closest projecting letter to the edge, not just the text-box boundary. Keep text clear of edge rounding and the ring opening.
Check ring movement and remaining material
Record hole diameter, ring wire thickness, ring outside size and material left between hole and tag edge. The wire must pass through and the ring must move around the edge without striking the text. Wear and load need application-specific testing. Stop if the ring, loading or remaining section is unknown; a sturdy-looking render is not strength evidence.
Inspect a calibrated full-size preview
The NOOR practice SVG has explicit millimetre dimensions, the 55 × 22 mm tag and a 50 mm calibration line. Print at actual size and measure that line. If it is not 50 mm, the paper preview is not to scale. The diagram preserves the original geometry and calibration in millimetres.
Confirm the physical sample after the paper preview
View the text at the intended distance and mark doubtful features. Record wording, final dimensions, letter measurements, relief, edge clearance, ring specification and preview result. Final approval also needs the agreed process check and representative physical sample; paper confirms neither printed detail nor attachment performance.
Order the chosen design and document its variants
Take exact wording, dimensions and colour preference to custom keychains. Use the existing design route for supported executions. For your own logo or unusual attachment, include the calibrated preview and ring measurements for assessment. The example dimensions are not mandatory product dimensions.
For multiple names or logos, define the variants before quantities. Check the longest name at the same size: acceptance of NOOR does not establish equal readability for longer text. For a separately quoted run, small-batch printing helps define what repeats and which variants need their own check.